what grit sand paper to sand wood boat deck for stain
Article Sections
- Intro
- The Basics of Grit
- What grits should I utilise?
- The Gold Rule of Sanding
- Why You Should Follow The Golden Rule Of Sanding (or how sanding works)
- How to choose your grits
- Applications and Tips:
- Applications By Grit Number
- Tips by Materials/Applications
- Determination
Intro
Whether you're new to woodworking – and therefore, sanding – or you lot've been around for years, choosing the correct grit sequence is cardinal for achieving a beautiful, fifty-fifty and smooth finish.
Nosotros know as well every bit anyone that sanding through the grits can exist a tedious affair, and we'd all rather be doing something else. Simply, when we cut corners, information technology definitely shows in the finish… Why? Well, we'll go to that. But, first, permit's talk over the basics of grit.
Superlative
The Basics of Grit
Sandpaper, or coated abrasives, as the broader category is known, are composed of abrasive grains, agglutinative and a substrate backing.
(Y'all can learn more than nigh these other elements in the linked articles. Backings. Annoying Grains. Coatings.)
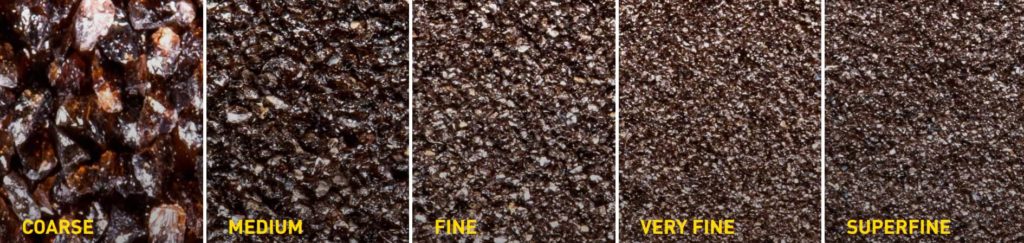
Coated abrasives, such equally sanding belts, discs or sheets, come up with a diverseness of standard grain sizes, more commonly known as dust, or grit size. The sizes are standardized and determined by two master methods: sieve number or micro grain. With the sieve number, grain size is determined past the number of meshes per inch, whereas with micro grains, the size is determined by the sinking speed during sedimentation.
There are different systems out there, and typically, Uneeda's products follow the FEPA standard, in which dust is denoted by the letter of the alphabet P and and then a number (e.chiliad. P100), where coarser, or larger grains, have a lower number and finer, or smaller grains, have a higher number. Sometimes a # sign is used. Depending on the textile, we offer products from P24 all the way to x,000.
This is much more than easily explained in the following graphic:

Top
What grits should I employ?
You might exist wondering, "does that mean I need to stock all the grits, from 24-2500 at all times?"
Well, no, not necessarily. What grits you lot'll need, and in what format of product (belt, disc, sheet, etc.) will depend greatly on your sanding application. For example, if y'all're simply e'er going to exercise rough sanding, vs if yous program on only using stain finish, or if you lot need to refinish cabinets or sand lacquer or other shiny finishes, will all influence what grits you lot should have on mitt.
If you lot don't demand to sand at every stage, you can limit what grits you demand… but, even if you do need to sand course through fine, as long as you stick to the aureate rule of sanding, yous still can get past without keeping every grit available in the shop.

Top
The Golden Rule of Sanding
So, what to do if you demand to rough sand all the mode on through to the finer grits for finishing?
The golden rule for choosing your sequence is to never skip more than 1 grit.
For case, if you showtime with P80, and need to cease at P240, rather than using every grit from P80 – P220, you tin do P80 – P120 – P180 – P240. This sequence cuts out P100, P150 and P220.
Caveat: This rule can generally be applied with higher quality abrasives, and we accept seen it hold true with our own products. We can, even so, brand no guarantees for products from other manufacturers. The only way to exist sure is to exam information technology out in your specific state of affairs.
Top
Why You lot Should Follow The Golden Rule Of Sanding
This comes dorsum to how sandpaper works.
When you are sanding, you are applying a sharp cutting tool to your surface and creating scratches made upwards of peaks and valleys – known every bit RA and RZ. When you lot use a coarse grit, y'all are creating a deeper scratch with higher peaks. The goal is, throughout your grit sequence, to even out the peaks and valleys so that the surface will become smoother, without "invading" the valley. If the valley of the scratch is invaded, the wood will close, causing pooling and a blotchy end.
Therefore, each annoying must be able to remove the scratch from the previous grit, and then, for example, if a P180 follows a P80, the P180 volition not totally remove the scratch. This will lead to over-sanding and swirls in the wood.


When yous practice follow the proper technique and Golden Dominion of sanding, each successive dust will remove the proper amount, leading you to a more than even scratch pattern on the terminal laissez passer.
In the analogy, you tin can see the highest peaks are the everyman grit, say lxxx, and if you skipped to 180, information technology only cuts the top, leading to a very uneven scratch pattern, versus the pattern all the way to the right, which is very even, and happens when yous progress through the grits without skipping.


Superlative
How to choose your grits
When evaluating the awarding to determine your dust sequence, start past asking yourself the post-obit questions:
- What phase am I at in the sanding process – calibration, leveling, shaping, training for stop, between coats of finish, scuff sanding, fine sanding or polishing – and what am I trying to accomplish?
- How much textile do I need to remove on one side of the work piece?
- How many sanding units do I accept available for the total sanding process (more applicable to broad belt sanding)
- What tool(s) volition I be using, or will information technology be hand sanding?
- Which grit do I want to finish with?
- What material am I sanding, and is information technology hard or soft? Is information technology very resinous, like pine?
These questions tin give you a adept sense of where to outset.
When determining your dust sequence, a practiced dominion of thumb is to choose the finest starting grit possible to reach your desired removal rate. This is because, while y'all could start with a lower dust, information technology will not only create actress work to compensate, but as well will be a less efficient sanding process.
Here is an case of how you might follow use this every bit a guide yourself.
Example:
You would like to sand solid beech. The total removal on one side is 0,8mm. You have ii sanding machines with 2 units in each. The required finish of the surface is P220.
Options:
P60 + P100 on the kickoff motorcar and P150 + P220 on the second machine is about efficient from the bespeak of lifetime of the chugalug. If you prefer footling bit better stop, utilize P80 + P120 and P180 + P220 instead.
Elevation
Applications and Tips
Following are some additional applications and various tips and guidelines to get you lot started.
Applications by Grit Number
P40-P60
- Remove bumps in the wood
- Remove one-time paints and finishes
- Crude lumber
P80
- Starting grit for hardwoods
- Remove shallow scratches
- Remove saw blade burns
P120
- Starting grit for softwoods
P150
- Prep for polyurethane & enamel paints
P180
- Raised forest grain fibers
- Surface irregularities
- Prep for latex & acrylics
P220
- Brainstorm surface finishing
- Prep for forest stain
P320
- Sanding between coats
- Wet sanding
P400
- Concluding surface finishing dust
- Smoothing top coats
- Prep for finishing oils
P600+
- Prep for polishing
- Metals and plastics
- Fine moisture sanding
Top
Tips by Cloth/Awarding
Solid woods
- The showtime chugalug you use should be P100 or coarser
- The first unit in the machine should be a metal drum or hard contact roller, with hardness measuring fourscore – 90 durometer
- Just jump over one grit east.chiliad. P100 to P150, skipping P120
- Do not remove too much with the last belts (to avoid wavy surface)
- Do non utilize finer grit than P240 for the final chugalug (in general enough)
Veneer
- The showtime belt you use should be P120/150
- Remove 0,15 -0,2mm to obtain best surface
- For white/raw wood, do non use effectively grit than P240 for the last belt, as going finer may crusade issues with the forest accepting stain.
MDF for painting
- Use sanding chugalug with grains of silicon carbide. Important on the final sanding belt
- Utilize grit P240/280 on the last chugalug for best terminate
Stain
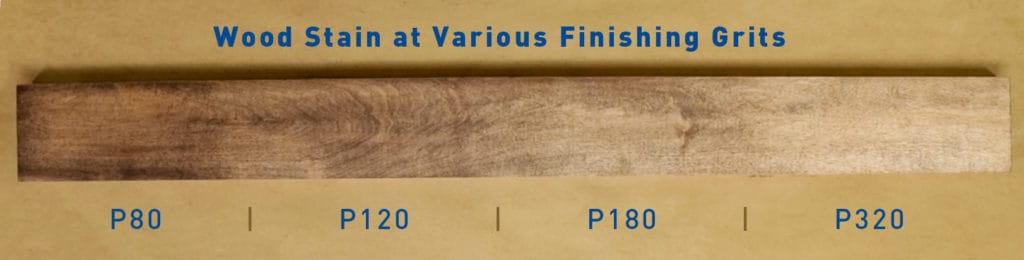
The to a higher place image features a exam board showing the absorption rate of stain with different last sanding grits, ranging from eighty-320, from left to right. The unabridged board was sanded at 80, then the post-obit sections followed the Golden Dominion. (80; 80-120; lxxx-120-180; and fourscore-120-180-240-320)
This test is not an indication that you should choose a item ending dust, simply rather an illustration that there is more absorption at lower grits. The all-time ending grit volition be according to personal taste, so information technology is recommended to do a test board with your bodily cloth and the stain you program to utilize. Likewise, cheque on any guidelines provided by the manufacturer of the stain product you lot plan to use.
Lacquer sanding
- Do not use too loftier sanding pressure and chugalug speed
- Apply a soft pad or contact roller
- Check that the graphite is non damaged
- When sanding hard lacquers a product with grains of aluminum oxide is recommended because this grain blazon volition cut the hard surface more than easily.
Top
Conclusion
As you can see, choosing the right dust and grit sequence, while conspicuously important, can be a relatively tricky business concern. In this article we covered the basics of dust, what it is and the common labeling systems, the basics of what each dust volition accomplish, and the Golden Rule of Sanding. Additionally, nosotros discussed some tips for sanding diverse materials and applications, as well as some basic guidelines for selecting your specific sequence. Every bit with anything as multivariant as sanding, trial and testing is the only existent fashion to determine the all-time practices for your awarding.
If you're a Uneeda customer and would like help in optimizing your process, contact us for back up from our tech team.
If you're just getting started with Uneeda, contact our sales team to receive product recommendations tailored to your needs.
Tiptop
buchananthersom2002.blogspot.com
Source: https://www.sandpaper.com/articles/grit-sequence-let-grit-do-the-hard-work-for-you/
0 Response to "what grit sand paper to sand wood boat deck for stain"
Publicar un comentario